
 Yes! Another GOLD project! And this one’s made from trash. Well… what someone else thought was trash, but that I knew was TREASURE.
Seeing as it’s spring here in OZ, everybody is doing their spring cleaning and that means it’s a treasure hunter’s favorite time of year. Especially since the city schedules a bulk trash roadside pick-up for a certain neighborhood each week, which makes it easy to plan where and when to hunt.
My first find of the year is this iconic little side laminate side table I found in my neighbors curb pile which was just begging for me to dip-dye it. So I did. And of course I did it in gold.
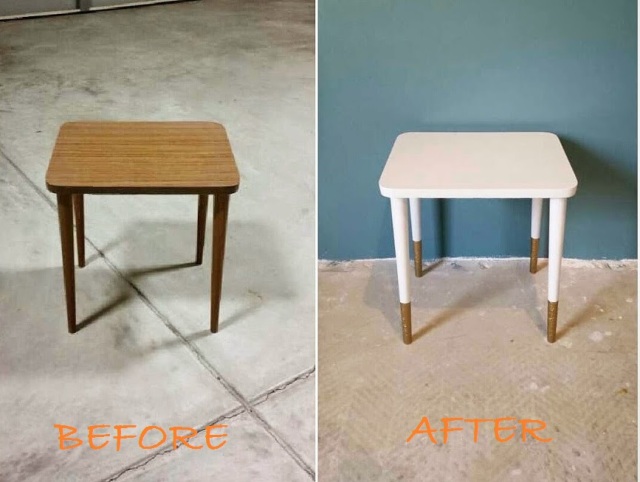
Well, technically it’s not dip-dyed but here’s how to DIY the look. My super-quick-and-easy version is, after painting the whole table white, I measured up, marked off, taped off and then spray painted the legs. Boom. Done.
It’s really easy, really cheap and a really quick way to update a flea market or roadside find. Here’s the step-by-step…
Step 1: SAND

This is important because it will affect how the primer/paint adheres. In the case of my table I only sanded the underside because the rest was laminate and I knew I would be using a combination primer-paint.
After sanding be sure to brush off all the excess dust!!!
Steps 2 & 3: PRIME & PAINT


In this case I was able to combine these two steps by using a primer and paint all-in-one spray paint. It’s much cheaper than buying primer and paint separately, and because the table is small and simple I was able to just spray the whole thing.

The paint I used was Rust-Oleum 2X Ultra Cover Paint + Primer and I applied 2 coats about 4 hours apart.
Step 4: “DIP-DYE”


This is the only tricky part… and by tricky I mean you have to be over the age of 5 to do it. So not really tricky at all.
This applies to any piece of furniture you want to impose the dip-dye look on. All you need is a ruler a pencil and some masking tape.
Decide how far up the leg you want the paint to be. Typically 1/4 – 1/3 of the leg is the way to go, but just eyeball it and decide what looks good to you. Now measure up the leg to that distance and mark off a dot with your pencil. Go around the leg making 3 to 4 marks so that you are able to “connect the dots” with your masking tape. Repeat on each leg.
Once you’ve marked each leg, wrap your tape around each leg ABOVE the dots, making sure the edge is touching the dots all the way around (aka it’s even). The tape will put up a bit of a fight if your legs are tapered like mine, so you might need to cuts slit in the edge that’s not aligning with the dots to make it easier to maneuver.
Now that the edge is locked down, tape further up the leg to protect it from the new layer of paint. If you’re spray painting this means at least 6 inches, or if your hand painting, maybe just another inch. Better safe than sorry though.


In this case I used Dy-Mark Revolution Enamel Spray Paint in Metallic Gold, which initially appealed to me for it’s ease and speed, but the result was actually an unexpected “foil” texture. In the end, I was thrilled. It looks 10 times more interesting than flat paint would have.
This effect may have been because I didn’t sand the laminate legs before applying the primer-paint layer, or because I didn’t wait 24 hrs between the primer-paint and gold paint layers. Or it may be unavoidable when using an enamel paint over a primer-paint. Either way, I was thrilled by the unexpected result. Next time you can bet I’ll intentionally go for the texture.
You could always use metallic gold pot paint or gold leaf paint if you want a smooth or aged look. Totally up to your interior style. Same goes for any color of course. If you’re going for mid-century modern try pastels over white or if you like rustic, brush paint only the leg tips white and leave the table natural. Do whatever. Get on with your bad self.
Now all that’s left to do is wait an hour to remove the tape, and then to be on the safe side wait 24 hrs before placing anything on top of the table.
Voliá – trash into treasure!


Time for you to go trash picking!!!
Cheers!


Lovely 👌👍
LikeLike
The gold texture is beautiful.
LikeLike